> ## Documentation Index
> Fetch the complete documentation index at: https://docs.zafapay.com/llms.txt
> Use this file to discover all available pages before exploring further.
# Payment Links
> Create shareable payment links from the merchant dashboard — no coding required
## Overview
Payment Links let you accept payments by sharing a URL or QR code with your customers. Create a link from the merchant dashboard, configure your products and settings, then share it via email, messaging apps, or print it as a QR code.
No API integration is required — everything is managed through the dashboard.
To use existing products in your payment links, [create your products and prices](/en/guide/products) first.
You can also create payment links with custom line items without registering products.
## Creating a Payment Link
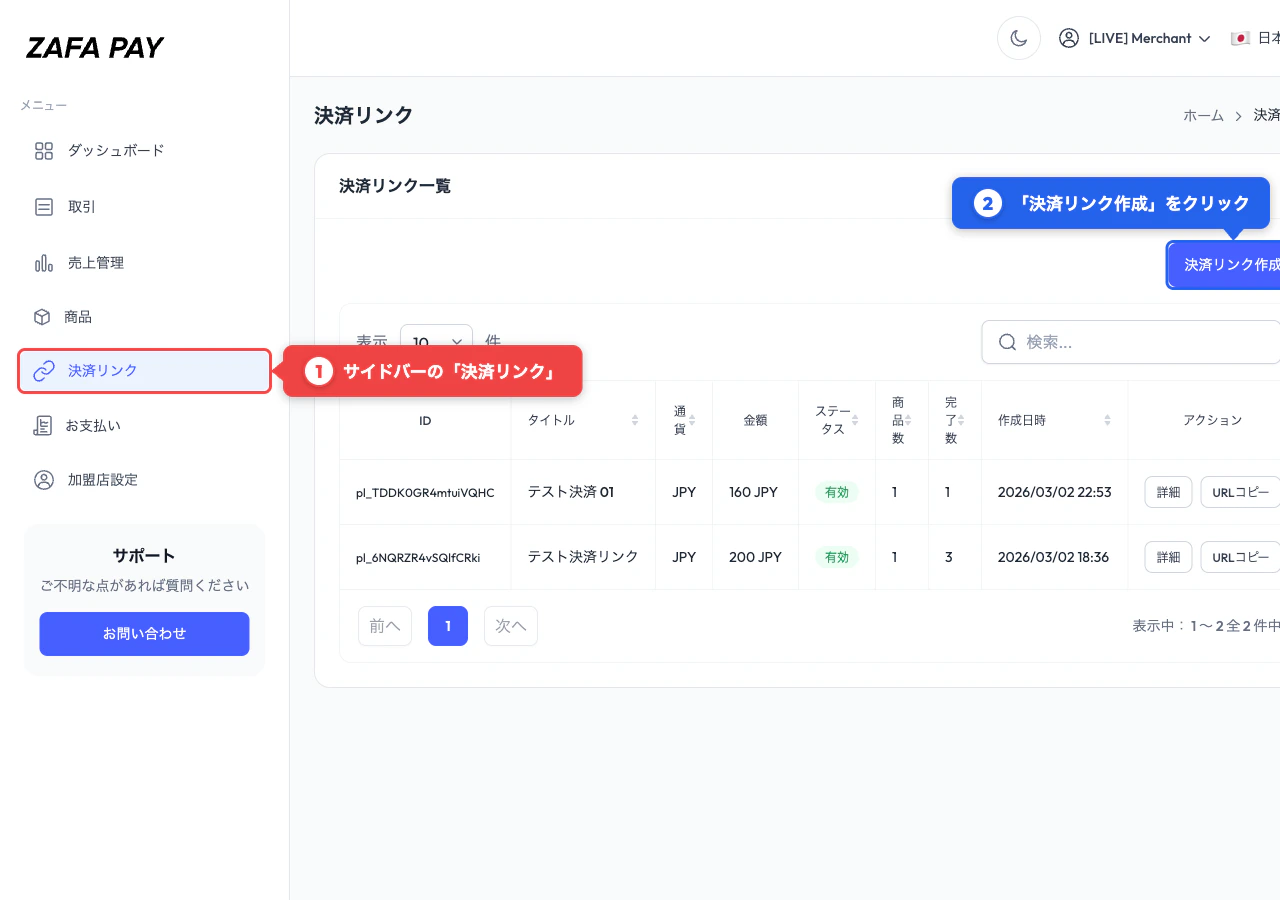
Go to **Payment Links** in the sidebar menu and click **Create Payment Link**.
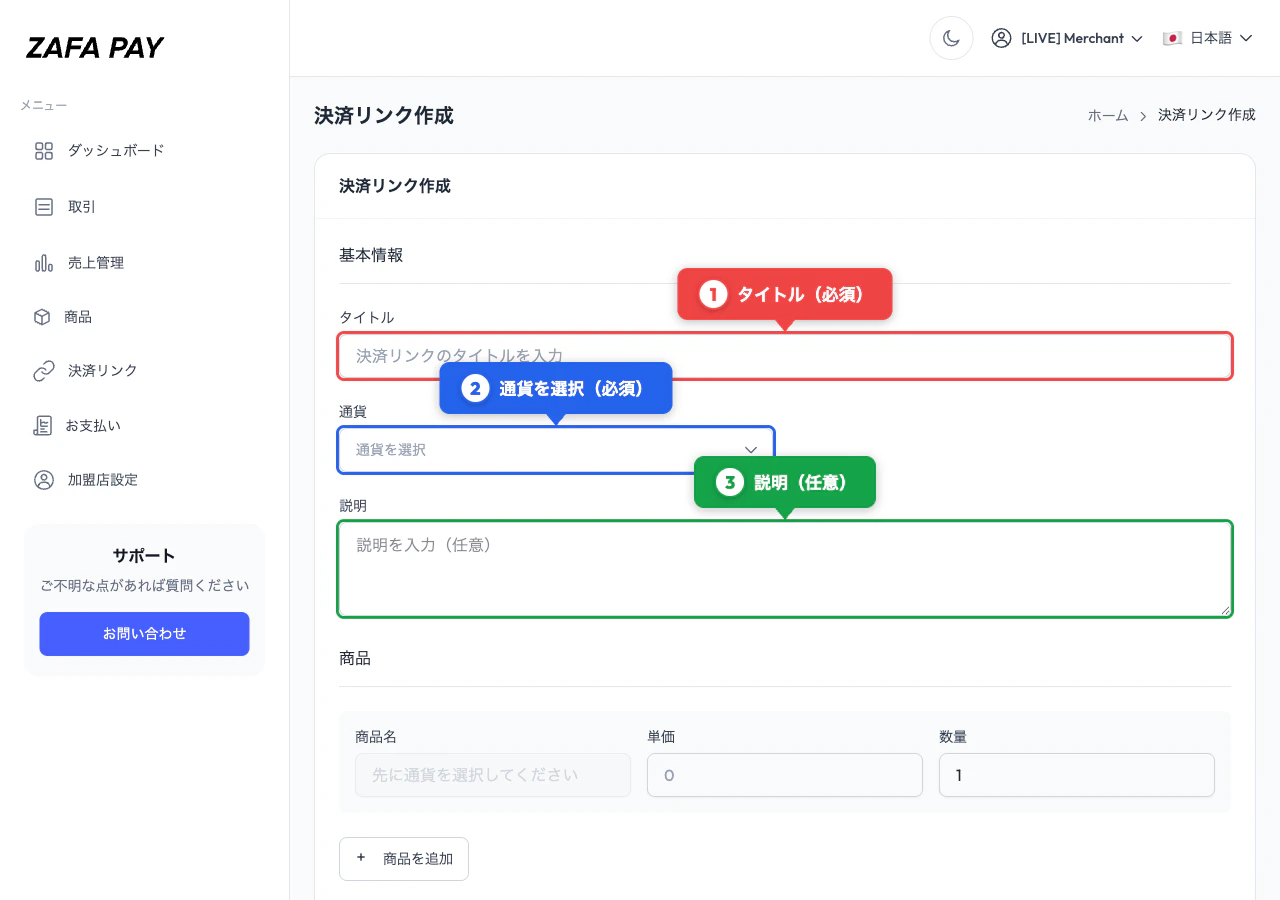
 Enter a **title** for internal reference and select the **currency** for this link.
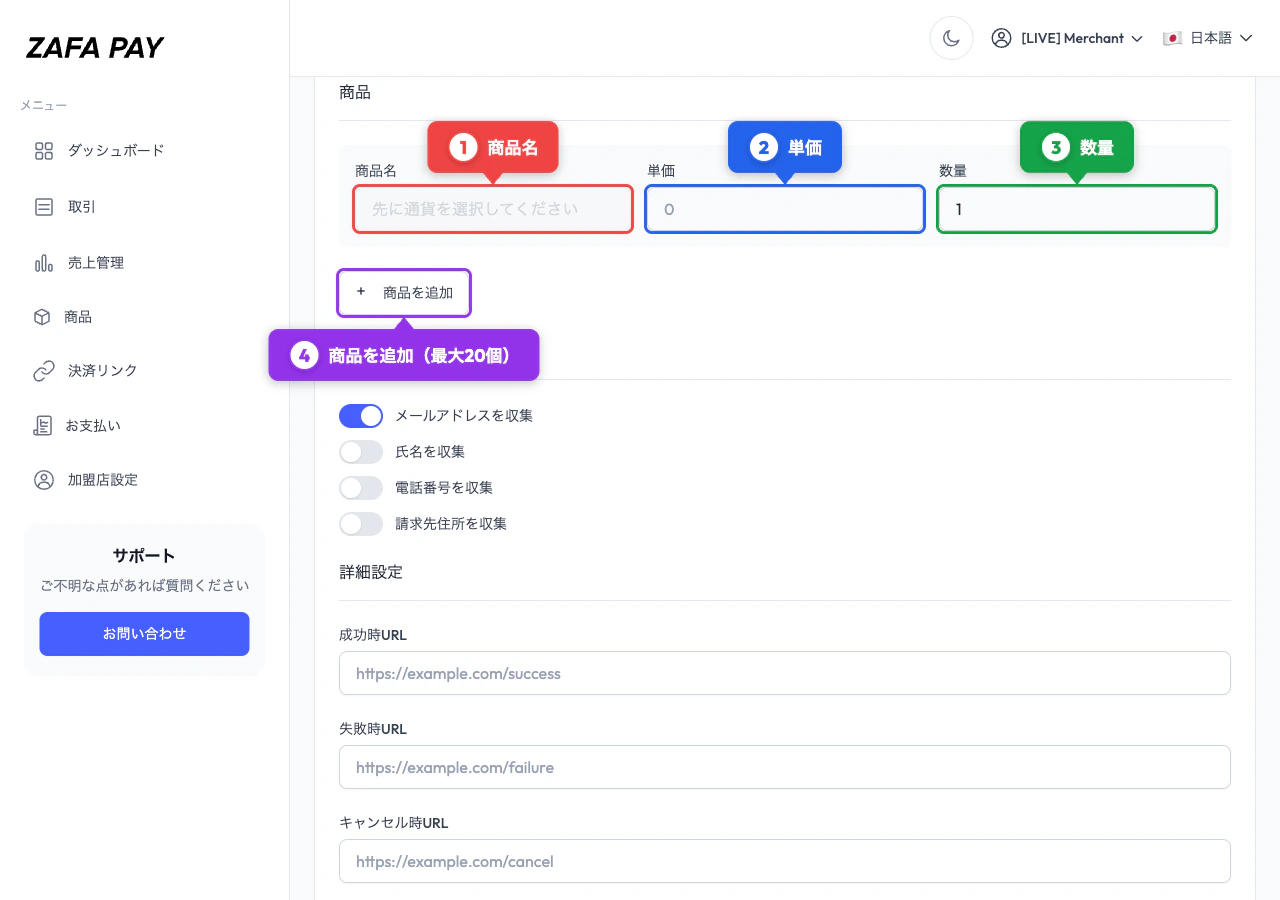
 Add up to 20 line items. For each item, you can either:
* **Select an existing product** — name and price are filled automatically
* **Enter a custom item** — specify a name and unit amount manually
Adjust the **quantity** for each item as needed.
Add up to 20 line items. For each item, you can either:
* **Select an existing product** — name and price are filled automatically
* **Enter a custom item** — specify a name and unit amount manually
Adjust the **quantity** for each item as needed.
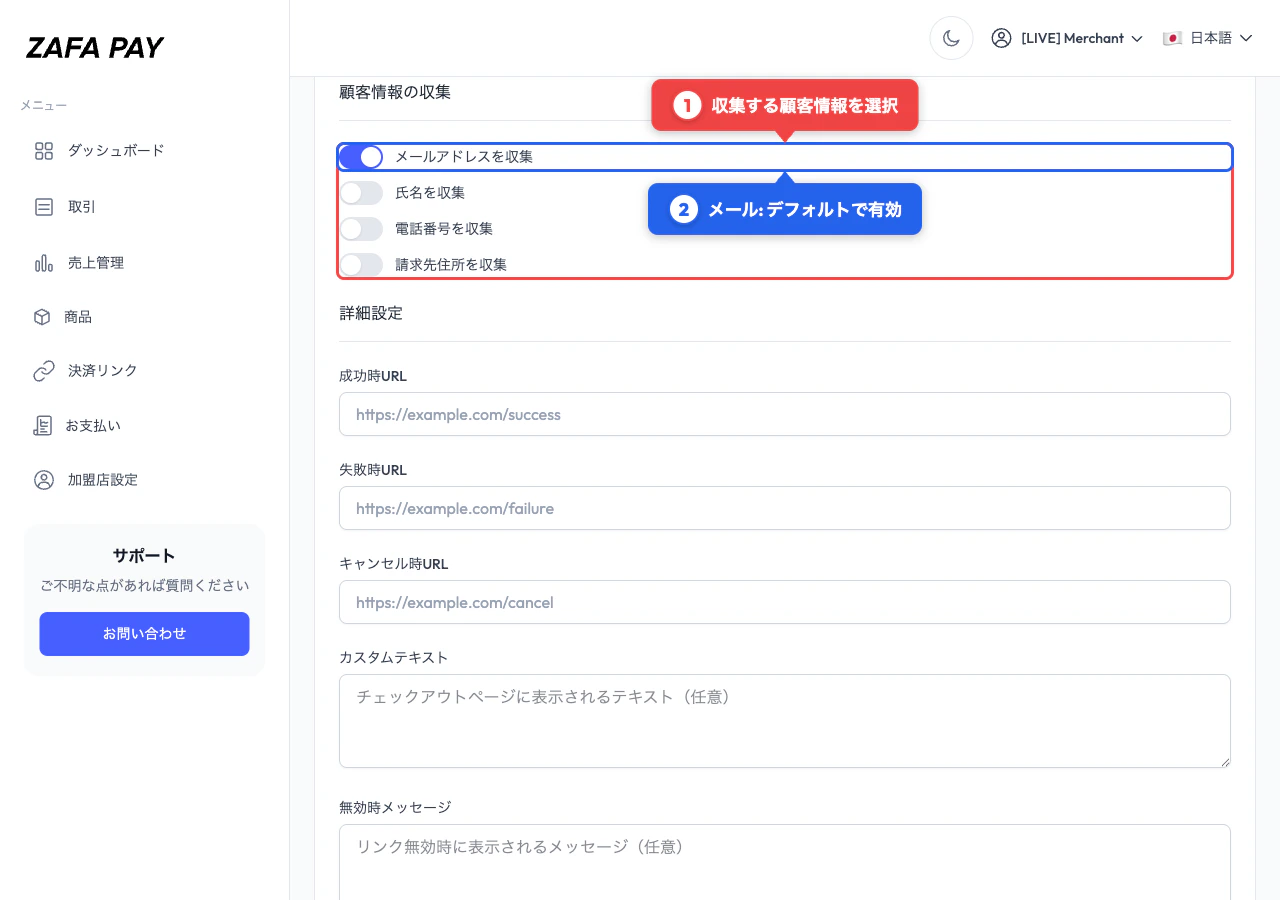
 Set customer information collection, redirect URLs, and other options (see below).
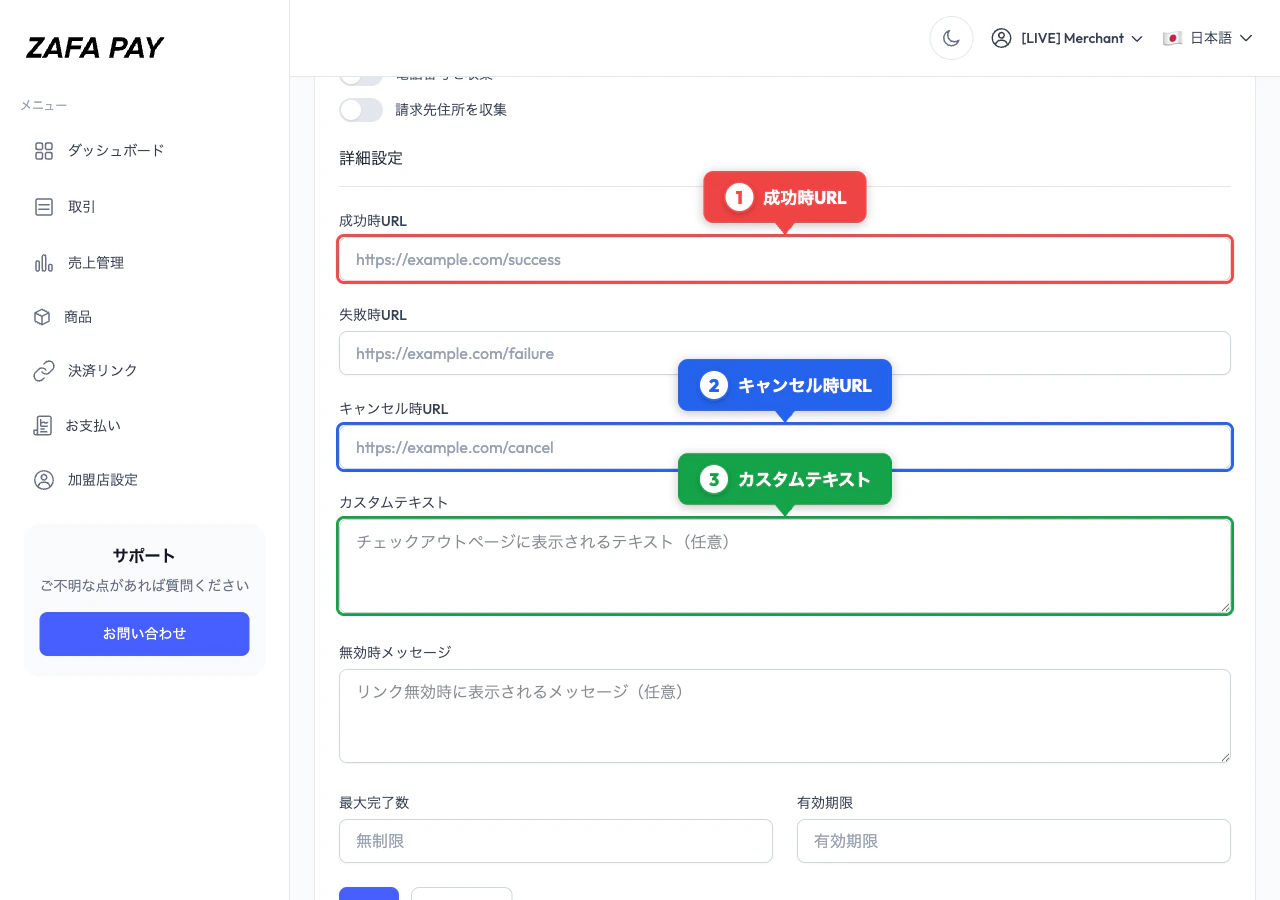 Click **Create** to generate your payment link.
## Settings
### Customer Information Collection
Choose which fields to collect from the customer at checkout:
| Field | Default |
| --------------- | -------- |
| Email | Enabled |
| Name | Disabled |
| Phone | Disabled |
| Billing Address | Disabled |
### Advanced Settings
| Setting | Description |
| ---------------- | ------------------------------------------------------------------- |
| Success URL | Redirect URL after successful payment |
| Cancel URL | Redirect URL if the customer cancels |
| Custom Text | Additional text displayed on the checkout page |
| Inactive Message | Message shown when the link is deactivated |
| Receipt Message | Custom message included in the customer receipt email |
| Max Completions | Limit the number of times this link can be used (empty = unlimited) |
| Expires At | Set an expiration date and time |
## Sharing
After creating a link, you can share it in two ways from the detail page:
* **Copy URL** — Copy the payment link URL to your clipboard
* **QR Code** — Download as PNG or SVG for printing or embedding
Click **Create** to generate your payment link.
## Settings
### Customer Information Collection
Choose which fields to collect from the customer at checkout:
| Field | Default |
| --------------- | -------- |
| Email | Enabled |
| Name | Disabled |
| Phone | Disabled |
| Billing Address | Disabled |
### Advanced Settings
| Setting | Description |
| ---------------- | ------------------------------------------------------------------- |
| Success URL | Redirect URL after successful payment |
| Cancel URL | Redirect URL if the customer cancels |
| Custom Text | Additional text displayed on the checkout page |
| Inactive Message | Message shown when the link is deactivated |
| Receipt Message | Custom message included in the customer receipt email |
| Max Completions | Limit the number of times this link can be used (empty = unlimited) |
| Expires At | Set an expiration date and time |
## Sharing
After creating a link, you can share it in two ways from the detail page:
* **Copy URL** — Copy the payment link URL to your clipboard
* **QR Code** — Download as PNG or SVG for printing or embedding
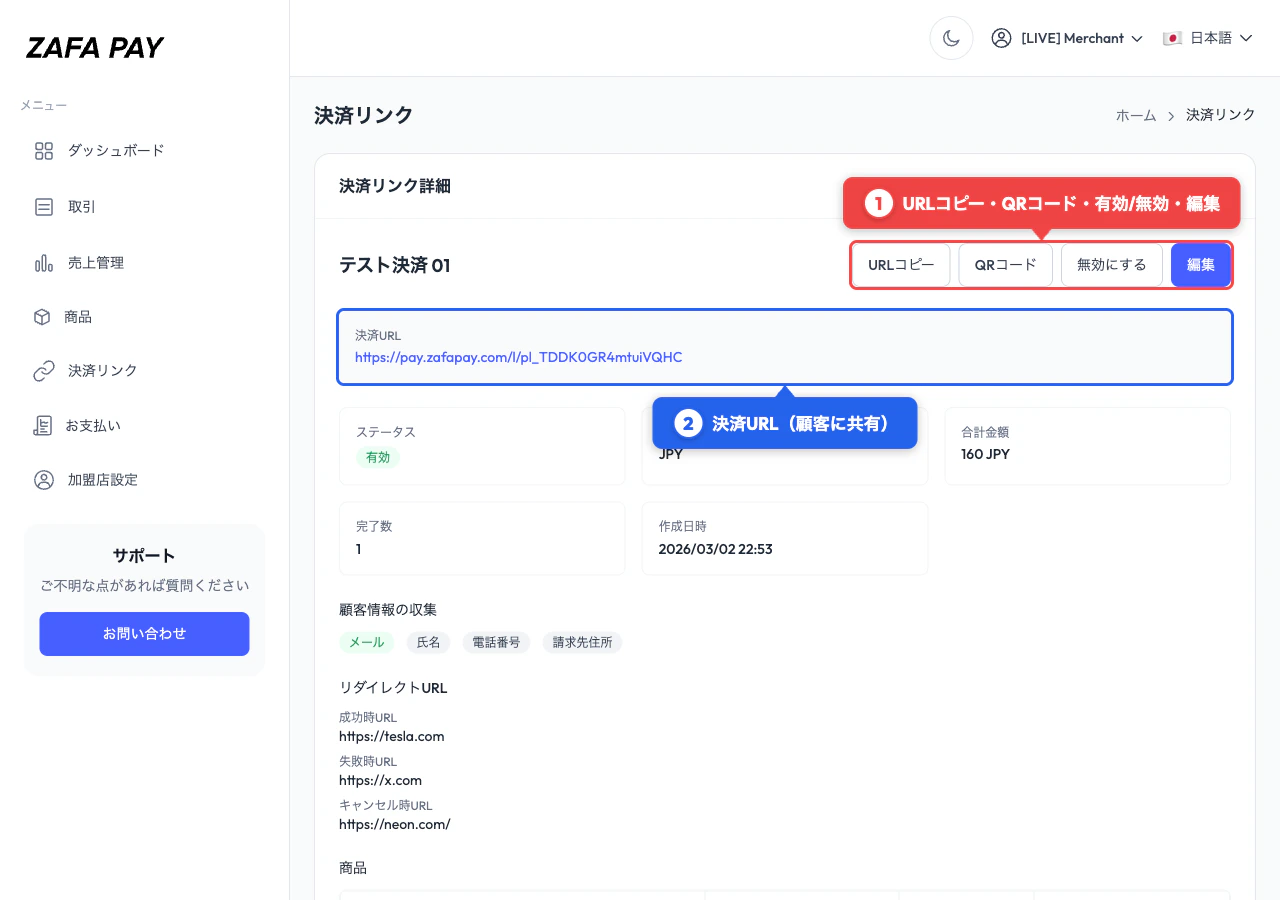 The payment link URL format is: `https://pay.zafapay.com/l/{link_id}`
## Managing Payment Links
### Editing
From the detail page, click **Edit** to modify the link. The following fields can be updated:
* Title, description
* Customer information collection settings
* Success / Cancel URLs
* Custom text, inactive message
* Max completions, expiration date
* Line item quantities
Currency, product names, and unit prices cannot be changed after creation. To change these, create a new payment link.
### Activating / Deactivating
Toggle the link status between **Active** and **Inactive** from the detail page.
* **Active** — Customers can access the checkout page and make payments
* **Inactive** — Customers see the inactive message instead of the checkout form
## Supported Currencies
| Currency | Code |
| ----------------- | ---- |
| US Dollar | USD |
| Japanese Yen | JPY |
| Euro | EUR |
| Singapore Dollar | SGD |
| Philippine Peso | PHP |
| British Pound | GBP |
| Australian Dollar | AUD |
| Canadian Dollar | CAD |
## Customizing the Checkout Page
You can brand the checkout page with your logo and brand color. These settings apply to all payment links and hosted checkouts.
Go to **Settings** in the sidebar menu to configure:
| Setting | Effect |
| --------------- | --------------------------------------------------------------------------- |
| **Logo** | Displayed in the checkout page header. Supports PNG, JPG, WebP |
| **Brand Color** | Applied to the Pay button on the checkout page (hex format, e.g. `#FF6600`) |
Logo and brand color are set once in your merchant settings — they automatically apply to all your payment links and checkout pages.
## Customer Receipt Email
You can automatically send a payment receipt email to customers after a successful payment.
To enable this feature, go to the **Settings** page in your [merchant dashboard](https://app.zafapay.com) and turn on **Send receipt to customer**. Once enabled, a receipt will be sent to the customer's email address for all payments, including those made via payment links.
To send customer receipt emails, the customer's **email address** must be collected at checkout. Email collection is enabled by default.
The payment link URL format is: `https://pay.zafapay.com/l/{link_id}`
## Managing Payment Links
### Editing
From the detail page, click **Edit** to modify the link. The following fields can be updated:
* Title, description
* Customer information collection settings
* Success / Cancel URLs
* Custom text, inactive message
* Max completions, expiration date
* Line item quantities
Currency, product names, and unit prices cannot be changed after creation. To change these, create a new payment link.
### Activating / Deactivating
Toggle the link status between **Active** and **Inactive** from the detail page.
* **Active** — Customers can access the checkout page and make payments
* **Inactive** — Customers see the inactive message instead of the checkout form
## Supported Currencies
| Currency | Code |
| ----------------- | ---- |
| US Dollar | USD |
| Japanese Yen | JPY |
| Euro | EUR |
| Singapore Dollar | SGD |
| Philippine Peso | PHP |
| British Pound | GBP |
| Australian Dollar | AUD |
| Canadian Dollar | CAD |
## Customizing the Checkout Page
You can brand the checkout page with your logo and brand color. These settings apply to all payment links and hosted checkouts.
Go to **Settings** in the sidebar menu to configure:
| Setting | Effect |
| --------------- | --------------------------------------------------------------------------- |
| **Logo** | Displayed in the checkout page header. Supports PNG, JPG, WebP |
| **Brand Color** | Applied to the Pay button on the checkout page (hex format, e.g. `#FF6600`) |
Logo and brand color are set once in your merchant settings — they automatically apply to all your payment links and checkout pages.
## Customer Receipt Email
You can automatically send a payment receipt email to customers after a successful payment.
To enable this feature, go to the **Settings** page in your [merchant dashboard](https://app.zafapay.com) and turn on **Send receipt to customer**. Once enabled, a receipt will be sent to the customer's email address for all payments, including those made via payment links.
To send customer receipt emails, the customer's **email address** must be collected at checkout. Email collection is enabled by default.